.jpeg)


What is Azure Blob Storage?
Azure Blob Storage is a cloud-based object storage solution provided by Microsoft Azure. It is designed to store large amounts of unstructured data in a way that makes it easily accessible over the internet.
One of the key advantages of Azure Blob Storage is its scalability. This means that you can start small and gradually increase your storage capacity as your needs grow, without having to worry about hardware limitations. With Azure Blob Storage, you can store up to hundreds of petabytes of data, which is an enormous amount of storage space.
Another advantage of Azure Blob Storage is its durability. This means that your data is protected against hardware failures, network outages, and other types of disasters that can result in data loss. Azure Blob Storage automatically replicates your data across multiple storage nodes, so even if one node fails, your data will still be accessible from another node.
Finally, Azure Blob Storage is highly available, which means that you can access your data from anywhere in the world, at any time. This is because Azure Blob Storage is built on top of Microsoft's global network of data centres, which means that your data is always available, no matter where you are or what time it is.
Why Do We Support Azure Blob Storage?
We see an increasing demand for scalable and secure cloud storage solutions to house big data. Azure Blob Storage is one of the most popular options used by both individuals and enterprises. By building a direct connection between Nexus and Azure Blob Storage, we enable automatic and fuss-free asset uploading. This helps users avoid the hassle of downloading the Blob Storage assets to a local storage and manually uploading them to Nexus, and also ensures that any updates made to the Blob Storage are automatically synced with Nexus.
Is Your Data Safe?
We do not hold any of your actual image data on Nexus. Rather, we are reading in the image metadata from your Blob Storage and loading that information on our platform. Additionally, the access is read-only. What this means is that your storage is essentially the master dataset. Changes to your image dataset on our platform will not be reflected in your storage. If you have made changes in your storage and sync on our platform, the most recent changes will be reflected.
Furthermore, Azure Blob Storage provides a number of security features to help protect stored data, including:
- Data Encryption: Azure Blob Storage supports encryption of your data both at rest and in transit. This means that your data is encrypted using industry-standard encryption algorithms when it is stored in Azure, and when it is transferred over the internet.
- Access Controls: Azure Blob Storage provides role-based access control (RBAC) and Azure Active Directory integration, which allows you to manage access to your data and resources based on the principle of least privilege. You can grant specific permissions to users or groups, limiting their access to only the data and resources they need to do their job.
- Data Protection: Azure Blob Storage provides built-in redundancy and backups, which help protect your data against hardware failures, network outages, and other types of disasters. You can choose between different redundancy options to ensure that your data is always available, and you can set up backups to create a copy of your data that can be restored in the event of a disaster.
How Does Your Blob Storage Sync Assets Onto Nexus?
Starting in your chosen project page, select the Dataset tab on the sidebar and select the option Connect to External Buckets at the top. You can then select Microsoft Azure from the dropdown list and click Proceed to start the process. Also, please be logged in to your Azure account so that you have all your Blob Storage information.

1. Blob Details
There are four items in this section:
- Connection Name is an identifier for the connection between your Nexus project and your Blob Storage, and can be whatever you want it to be named.
- Storage Account Name is the name of your Storage Account in Azure, which should follow Azure’s naming standards, such as no usage of special characters.
- Container Name is the name of your Container in your Storage Account that holds your assets. It should also follow Azure’s naming standards.
- Folder Prefix is an optional entry allowing you to choose specific subfolders or blobs in your Container for integration. This is for you to restrict Datature's access to only the folders that you want it to read. If left empty, Nexus will just use the data in the root folder of the Container. Ensure that the overall folder path is to a folder filled with the assets that you want to be read.

2. Azure Policy
In this section, Datature generates three snippets of information that you must execute in order. The first is a shell command to create a unique service principal, the second is the IAM Role Assignment identifier, and the third is the role assignment conditions.

You will need to run this command using the Azure CLI. For more information on how to install the CLI and authenticate your Azure account, please refer to the Azure CLI documentation. Upon running the shell command, you should see a JSON output similar to following:
Then, head over to the Azure website under your account and go to <YOUR_STORAGE_ACCOUNT_NAME> → Access Control (IAM) on the sidebar.

In the Access Control (IAM) Dashboard, click Add → Add Role Assignment to create a new role assignment. In the Role tab, scroll down until you see the Storage Blob Data Reader role. Select the role and click Next.
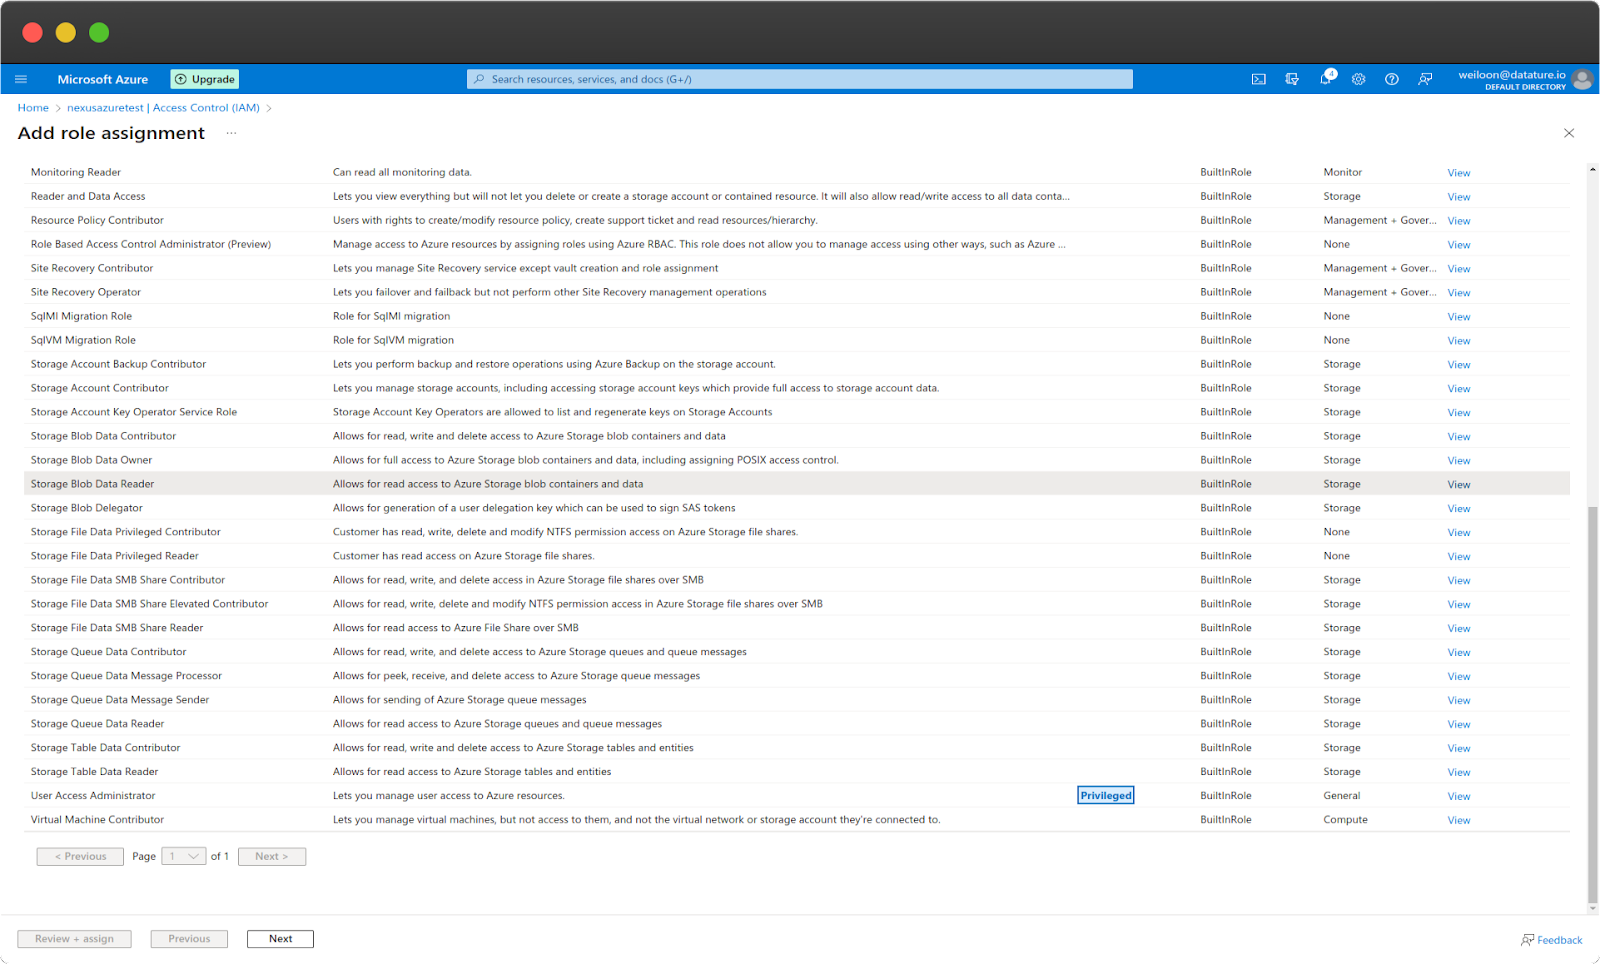
In the Members tab, click on Select members. In the Select field, copy and paste the IAM Role Assignment identifier from Nexus and click on the option that pops up. Press Select to confirm the member and click Next to proceed.

In the Conditions tab, click on Add conditions to add a new condition to your role assignment.

Select Code as the editor type, copy and paste the JSON condition from Nexus, and click Save. Finally, you can click on Review + assign to confirm and create your role assignment.
You can click on the Role assignments tab to verify that your new role assignment exists.

3. (Optional) Resource Sharing for Video Assets
If your Blob Storage contains videos, you will need to set resource sharing (CORS) rules to enable Nexus to access your video assets. Simply head over to the Resource sharing (CORS) section under Settings in the sidebar. In the Blob service tab, add `https://nexus.datature.io/` in the Allowed origins field and set the Allowed methods to `GET`. Click Save to commit your changes.

4. Blob Storage Connection
You can now complete the Blob Storage connection. Do note that the Azure changes could take up to 5 minutes to take effect. Hence, it will be normal if you face a broken heart with text saying that there are storage connection issues. You can click on Retry to refresh the storage connection. However, if this issue persists after 5 minutes, please check that you have entered all credentials and names correctly.

If the storage connection is successful, you will see a green heart with text saying that the storage connection is complete.
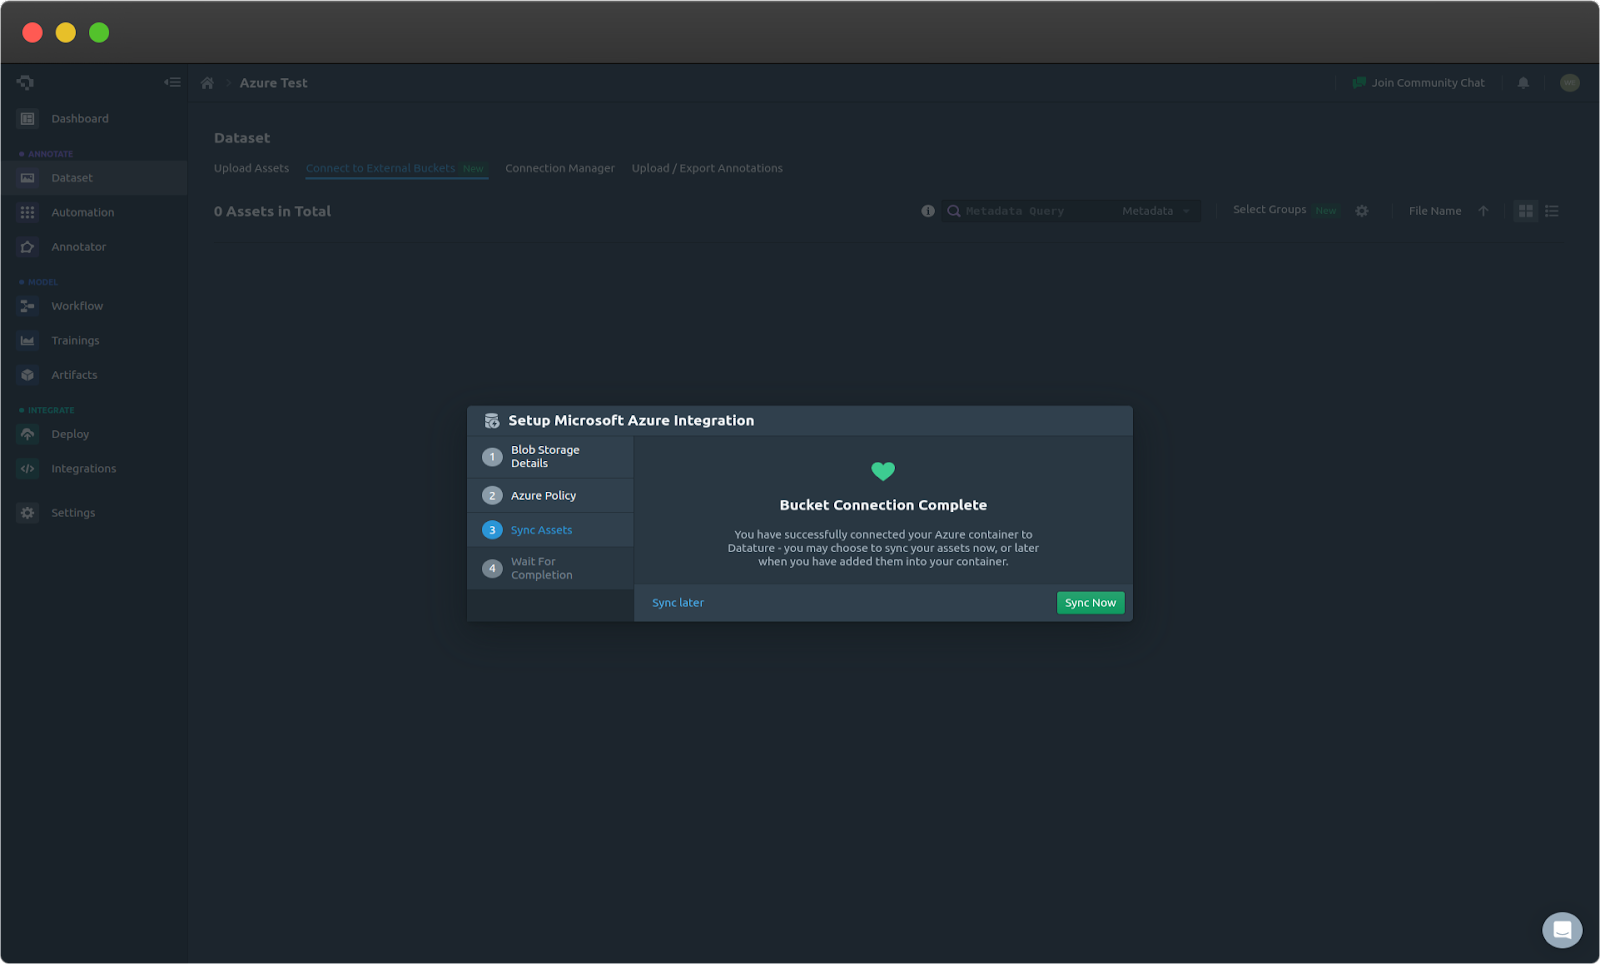
5. Sync Assets
Now that your Blob Storage is connected to Nexus, you can now choose whether you want to Sync Now or Sync Later. Note that you can always sync at any time after the connection has been made in Step 3. If you choose Sync Now, Nexus will begin to sync your asset metadata from the storage onto the platform. Once the sync has completed, refresh your Dataset page to see your assets loaded in from the Blob Storage!

Next Steps
Once your assets have been successfully uploaded to your Nexus project, you can begin creating annotations using our in-house annotation tool suite. You can consider using our Intelligent Tools such as Intellibrush and AI Edge Refinement for more precise annotations.
If you think that annotating large quantities of data is too much of a hassle, we offer Model-Assisted Labelling to streamline your MLOps pipeline by iterating upon previously trained models to assist in data annotation for model retraining, and External Labelling Services to quickly get your dataset annotated by a team of labelling experts.
Our Developer’s Roadmap
Additionally, we have roadmaps in place to expand asset syncing capabilities with other available cloud storages such as Amazon S3 and Google Cloud. This will allow users and enterprises that have existing data stores to conveniently utilise Nexus to train models to optimise their operations pipelines.
Want to Get Started?
If you have questions, feel free to join our Community Slack to post your questions or contact us about how asset uploading via Azure Blob Storage fits in with your usage.
For more detailed information about the Blob Storage connectivity, customization options, or answers to any common questions you might have, read more on our Developer Portal.
.png)
.png)