.jpg)
.png)
What is Generative AI?

Generative AI refers to a type of artificial intelligence that is capable of generating new content that has not been explicitly programmed into the system. This is achieved by using machine learning algorithms to analyze and learn from large datasets, and then using that knowledge to create new content such as images, music, text, or even video.
Generative AI models are typically based on neural networks that use probabilistic methods to generate content that is similar to the training data, but not identical. For example, a generative AI model trained on a dataset of bird images might be able to generate new images of birds that have never been seen before.
Why is Generative AI Useful?
Generative AI has the potential to automate and streamline many tasks and processes, improve the quality and diversity of content, and provide new insights and predictions that can help individuals and organizations make better decisions. Specifically, it can be used in a variety of ways, such as:
- Content Creation: Generative AI can be used to create new and original content, such as images, music, and text, that can be used in various industries, such as advertising, marketing, and entertainment.
- Data Augmentation: Generative AI can be used to create new data samples that are similar to existing data, which can be used to train machine learning models and improve their performance.
- Simulation: Generative AI can be used to create simulated environments and scenarios that can be used to test and evaluate new technologies, such as autonomous vehicles and robots.
- Personalization: Generative AI can be used to create personalized content, such as product recommendations and news articles, based on individual user preferences and behaviour.
- Predictive Analysis: Generative AI can be used to generate predictions and insights based on large datasets, such as predicting stock prices or identifying potential health risks.
What Images Can You Expect to Generate?
Generative AI models excel at generating varying images in which there is a prominent object in the foreground and contextualized background. In these conditions, the models are capable of seamlessly replacing objects or backgrounds, changing graphic styles, or creating similar variations on images. This can allow users to easily create high quality art, create production quality product advertisement photos, or even augment and populate computer vision datasets by replacing backgrounds or foreground objects to cover edge cases.
What are Some Generative AI Methods?
There are many methods to generate data, ranging from more traditional cut-and-paste methods to from-scratch generation using state-of-the-art probabilistic models.
Generative Adversarial Networks (GANs)
Generative Adversarial Networks (GANs) are a type of generative AI technique that uses a system of two neural networks to generate new content. The first network, called the generator, creates new samples, such as images or text, from a random noise signal. The second network, called the discriminator, evaluates whether the generated samples are similar enough to the training data.

The generator and discriminator are trained together in a process known as adversarial training. The generator tries to create samples that can fool the discriminator into thinking they are real, while the discriminator tries to correctly classify the generated samples as fake. The result of this process is a generator network that is able to create new samples that are similar to the training data.
Despite their impressive results, GANs can be challenging to train and can suffer from issues such as mode collapse, where the generator produces a limited set of outputs rather than diverse and unique samples.
Stable Diffusion

Stable Diffusion is a variant of the diffusion process, which is a probabilistic model used in statistical physics to describe the behaviour of particles in a fluid. In the context of generative AI, Stable Diffusion refers to a method that gradually generates an image from a noise signal. The noise signal is passed through a sequence of increasingly complex convolutional neural networks (CNNs), with each network generating a slightly more refined version of the image. This process continues until the final output is generated, which is a high-quality image that is similar to the original training data.
The Stable Diffusion technique is designed to address some of the limitations of other generative AI techniques, such as generative adversarial networks (GANs), which can be unstable and difficult to train. Stable Diffusion is more stable and can produce high-quality, diverse, and realistic images that are suitable for a wide range of applications.
Generating Product Images with Generative AI
In this example, we will look at how we can combine certain methods together with traditional Computer Vision algorithms to generate more pristine images. The task for this example will be background augmentation for single objects, which can be used for a variety of applications such as object identification and product placement.
The three key ingredients for convincing and sufficiently varied images are:
- Object Transform and Color Augmentations: creates more variation of the object to widen the variety of environments and scenarios it can be placed in.
- Background In-Painting: creates environmental variation in the background.
- Object In-Painting: fills in the background completely for a smoother transition between foreground and background.

All experiments below are run on a NVIDIA RTX 3080. If you wish to replicate the results or perform your own testing, it is recommended to use a GPU with at least 12GB of VRAM.
Stable Diffusion In-Painting
The original intent of Stable Diffusion was to generate new images from pure noise. However, one modification that has been gaining attention is the process of in-painting. It is traditionally a computer vision technique used to fill in or restore missing or damaged parts of an image. It involves automatically filling in the missing regions of an image with plausible content, such that the filled-in areas appear visually coherent and seamless with the surrounding areas. By masking certain areas of an image, we can direct Stable Diffusion to modify only the masked areas by iteratively re-noising and then denoising them based on a textual prompt.
We first need to obtain a segmentation mask of the object, which we can annotate on Datature’s Nexus to obtain a segmentation polygon. We then convert the polygon into a binary mask, where black pixels are preserved and white pixels will be in-painted.
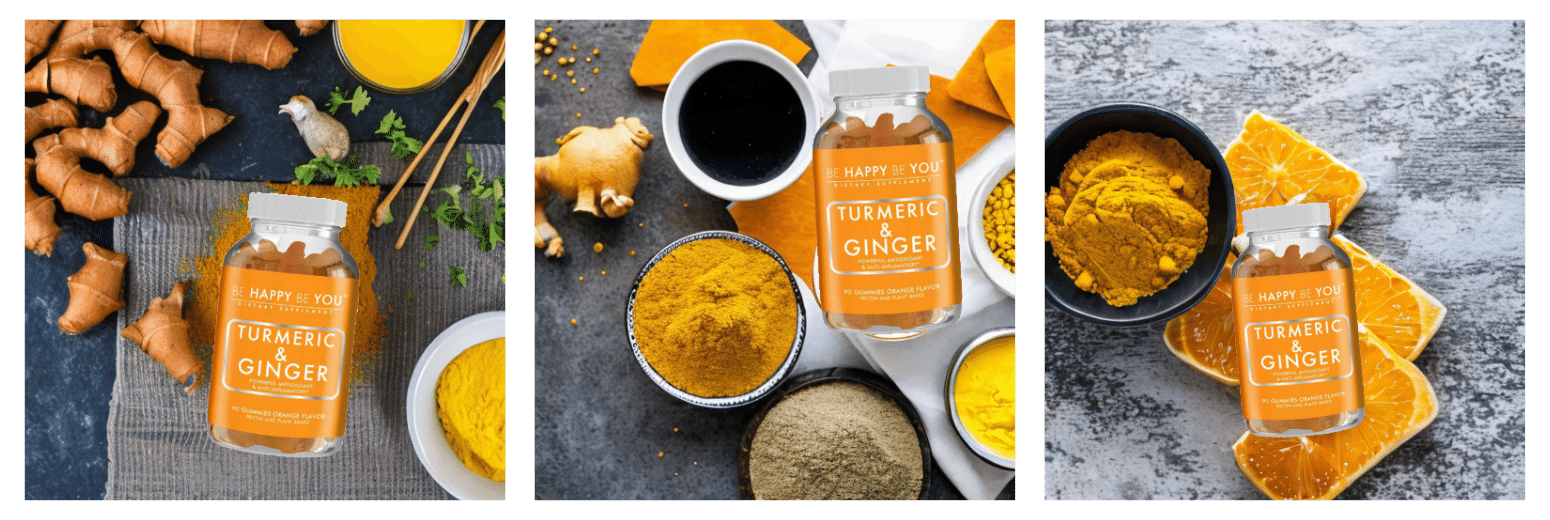
We can then set up the Stable Diffusion pipeline by loading the image, mask, and set various parameters that are listed in the full code. To learn more on how the experimental parameters affect image generation, check out this handy guide. The prompt we will be using is “on a table with turmeric and ginger”.

By in-painting the background instead of regenerating the whole image from scratch, Stable Diffusion is able to match the lighting conditions of the background with the object. However, there are a few imperfections, most notably that the borders between the object and the background are not pristine. The denoising process can sometimes warp the object which might not be ideal.
A less noticeable imperfection can be seen in the bottom row of text, which becomes gibberish. Though Stable Diffusion is known to be decent in generating text, especially in StabilityAI’s latest XL model, the text generation is typically guided by the prompt. In this case where there is existing text, it is not able to accurately reconstruct the text as this semantic information is not retained during the re-noising process. While larger text can be accurately reconstructed to a large degree, smaller text will suffer from being completely unintelligible. This is an issue that increasing the number of inference (denoising) steps to improve image quality and detail cannot solve.
Two-Stage Background In-Painting
To workaround this issue, we can perform object in-painting as a second stage to generate a pristine background. We then overlay the object (segmented from the original image using the binary mask) on top of the pristine background.

The final image is crisper and looks more realistic. This seems to be a potential solution that can be used for image augmentation. However, we note that the object is still static. Its dimensions, location, and orientation are unchanged. This limits the amount of variation in the resulting generated dataset, and also limits Stable Diffusion in its generative power.
A solution to this is to perform traditional augmentations to the original image before it is fed into the Stable Diffusion pipeline. A popular library to do this is Albumentations, which efficiently implements a rich variety of image transform operations that are optimized for performance. It is widely used both in industry and in deep learning research.
A sample transformation is shown by shifting, scaling, and rotating the object with varying parameters. When the transformed image is fed into the Stable Diffusion pipeline, we obtain the following images:
Further testing with other input images yields the following results:


The benefit of using transformation augmentations is that segmentation masks already exist for the objects, as the same transformations can be easily applied to the original mask.
Colour Augmentation with InstructPix2Pix
To create even more variation, we can utilize InstructPix2Pix to modify other aspects of the object. InstructPix2Pix is a conditional diffusion method for editing images from human instructions that combines the powers of Stable Diffusion and GPT-3. It is currently not robust enough to make drastic modifications to images without losing semantic information, hence our example will simply be to modify the colour of an object.

The resulting image can then be passed on to Stable Diffusion in-painting to obtain the following results:

Control Image Generation and Style Transfer with ControlNet
P.S. As pointed out by a fellow HackerNews reader, we clearly forgot to include our code snippet for ControlNet in the article.
ControlNet can be similarly utilized If you wish to have some control over what is being generated, or perform some style transfers to your objects and backgrounds. Any input images can first be preprocessed to generate a Canny edge map, which is then fed into the ControlNet pipeline for directed generation. Further preprocessing may be needed depending on your input image and the level of detail desired for the image generation to be visually realistic.
If you wish to replicate the results or experiment with your own images, check out this link to view the full suite of demo scripts.
Limitations of Generative AI
Generative AI is a potential solution for image augmentation/generation, however, it is not yet ready for any large-scale generation at this stage. There is no universal solution that can reliably work on custom datasets and there is insufficient fine-grained control over how images can be specifically augmented.
The generation is also not fully automatic since there is a lot of prompt engineering and cherry picking involved, which requires a lot of user intervention and a deeper understanding of the nature of the dataset. Due to the compute power and time necessary to generate these images, it would be impractical to scale up to large dataset generation without investing heavily in dedicated hardware.
Table of generation times (in seconds) for each stage against varying iteration steps.
Given the rate of development of methods like Stable Diffusion over the recent months, perhaps future research developments in this field would solve these limitations and render a more practical tool that can be easily adopted on any platform.
Our Developer’s Roadmap
Generative AI is a powerful tool that can boost the development of ML applications by reducing the effort required to curate and annotate large datasets. As the power of Generative AI grows, we plan to incorporate some of these techniques to quickly populate your datasets on Nexus for improved training performance and model robustness. Generative AI can also boost the expansion of our Public Datasets for the community to easily utilize for any use case.
Want to Get Started?
Check out the full notebook if you wish to try augmenting your own images! If you have questions or would like to show off your custom-generated images, feel free to join our Community Slack or contact us about how Generative AI fits in with your usage.
For more detailed information about the functionality of different Generative AI models, customization options, or answers to any common questions you might have, read more about the process on our Developer Portal.
Build models with the best tools.
develop ml models in minutes with datature