Lorem ipsum dolor sit amet, consectetur adipiscing elit, sed do eiusmod tempor incididunt ut labore et dolore magna aliqua. Lorem ipsum dolor sit amet, consectetur adipiscing elit, sed do eiusmod tempor incididunt ut labore et dolore magna aliqua.Lorem ipsum dolor sit amet, consectetur adipiscing elit, sed do eiusmod tempor incididunt ut labore et dolore magna aliqua.
Datature Nexus is an end-to-end MLOps platform that simplifies the computer vision workflow for individuals and businesses looking to incorporate artificial intelligence (AI) into their projects. Users can annotate and augment images, train state-of-the-art computer vision models, and seamlessly deploy them — all without the need for coding expertise.
Nexus now extends its support to medical image formats, including DICOM and NIfTI! Continue reading to discover how you can leverage Nexus to create and deploy your customized deep learning model for medical applications.
This is the first article of a two-part series. In this article, we will dive into why Nexus might be the perfect choice for you, along with a step-by-step guide on how to upload and annotate 3D medical images with Nexus. In the next article, we'll take a closer look at model training and deployment.
What is Non-invasive Medical Imaging?
With the remarkable advancements in medicine over the last century, groundbreaking technologies such as non-invasive medical imaging have emerged as invaluable tools, aiding doctors and medical professionals in making diagnoses and prognoses with enhanced confidence and precision. Imaging techniques like X-rays, computed tomography (CT), magnetic resonance imaging (MRI), and ultrasound offer visual insights into the internal structures of the human body, allowing healthcare professionals to detect anomalies, identify tumor locations, and assess disease progression swiftly and safely. This greatly reduces the necessity for invasive procedures, minimizing the associated risks and improving patient outcomes.
Challenges in Medical Imaging Data Analysis
As the volume and complexity of medical imaging data continue to grow, new challenges arise in effectively analyzing and interpreting these images. Traditionally, the task of examining these images, including the identification and localization of tumors, has relied heavily on the expertise of trained radiologists and doctors. These professionals have shouldered the responsibility of carefully reviewing and assessing each image to detect and diagnose abnormalities. With the escalating volume of imaging data, manually reviewing these images imposes an increasing burden on their already demanding clinical responsibilities, placing additional strain on their time and cognitive resources. This necessitates innovative approaches and solutions for streamlining and automating the image analysis workflow.
Current Solutions for Streamlining Medical Image Analysis
Specialized software tools and platforms have been developed to streamline and expedite various aspects of the image analysis process. For example, ITK-SNAP is a widely used medical image segmentation tool that provides computer-assisted manual segmentation of anatomical structures in 3D and 4D medical images. It leverages active contour methods to facilitate the extraction of object boundaries, enabling semi-automatic segmentation and reducing the time required to trace or segment regions of interest.
Furthermore, recent developments in AI have led to notable improvements in the automation of segmentation and analysis processes. Medical software tools like 3D Slicer have embraced these AI techniques, particularly deep learning, to automate the identification and segmentation of anatomical structures, tumors, and other abnormalities in medical images. These tools deploy “domain-specific models” or “specialized models” that have been specifically trained using large sets of labeled data to identify specific anatomical structures such as the liver, lung, and spleen, or to segment anomalies like brain tumors. Once the model completes the detection or segmentation task, medical experts can review the outcomes and make any necessary refinements.
Limitations of Current Solutions
While these out-of-the-box AI-assisted tools have the potential to significantly reduce the manual effort required from doctors and healthcare professionals, it is important to acknowledge their limitations. These tools rely on pre-existing models that have been trained either by the platforms themselves or through contributions from other users. Since the models are not universally adaptable to all scenarios, doctors and researchers working with unique datasets or tackling rare conditions may find it difficult to take advantage of the automation capabilities provided by these tools. In addition, these tools are typically built as standalone solutions and not meant to be integrated into larger software ecosystems, which can pose integration difficulties for startups and companies seeking to incorporate these solutions into their existing workflows.
Datature’s Solutions and Successful Use Cases
Datature presents an easy solution for such scenarios. The Nexus platform by Datature is an industry-agnostic, all-in-one MLOps platform that supports users at any technical level to effortlessly build, train, and deploy their customized computer vision models. For users who are in the early stages of exploring AI, the platform offers a diverse array of default features to assist them in developing their first model. Meanwhile, users who are more comfortable with deep learning concepts can take advantage of the platform's flexibility to tune various parameters to accelerate production without compromising on model customizability. And most importantly, the platform is designed to support seamless and industry-standard integration, whether it involves deploying the model through Datature’s reliable global cloud infrastructure to scale an application or exporting the model to use it as an inference.
Join the ranks of thousands of teams worldwide who have achieved remarkable success by leveraging Datature's platform to build and launch their products. Read our user spotlights to see how Datature supports HealthTech startups like BrainScanology and MacroInsight in revolutionizing healthcare through AI.
Step-by-Step Guide
In the following sections, we will demonstrate how Datature users can build a customized tumor detection system with Nexus.
1. Preparing the Data
Nexus works well with images from diverse radiology modalities like X-rays, CT scans, and various types of MRI such as T1, T2, and FLAIR. It accommodates a range of image and video file formats, including JPEG, PNG, MP4, as well as specialized medical image formats like DICOM and NIfTI. In this demonstration, we will look at some Gadolinium-enhanced T1-weighted (Gd-T1w) MRI scans in NIfTI format from the Medical Segmentation Decathlon brain tumor dataset.
2. Creating a New Project on Nexus
First, sign up for a free Datature account at http://www.datature.io. Then, log in and follow the prompts to create a new project on Nexus. For more information on how to sign up and create a project, check out our documentation!
The Nexus Platform : Project Home Page
3. Importing Data to Nexus
For common file types such as PNG and JPEG, users can drag and drop the image files into the "Upload Assets" box under Dataset.
The Nexus Platform : Dataset Page (Upload Assets)
For NIfTI files, we can use Datature’s Python SDK either through the Command Line Interface (CLI) or a simple Python script. Both methods will require the system to have Python 3.7 or above installed.
On Nexus, we first need to acquire our project’s secret key. This is only available to project owners to maintain security. As a forewarning, if a project’s secret key is regenerated, the previous secret key becomes invalid and the new key must be used for access.
Go to the project’s Integrations page
Choose "Generate New Secret" to get the project’s secret key
Save the secret key somewhere safe
Method 1 - Command Line Interface
1. Launch a Terminal window
2. Install Datature’s CLI
$ pip install -- upgrade datature
3. Authenticate
Type the following into the terminal then follow the prompts to complete the authentication.
$ datature project auth
4. Upload data
Type the following into the terminal then follow the prompts to enter relevant information about the data.
$ datature asset upload
5. Monitor the progress
Progress bars will be shown in the terminal during the upload process.
Method 2 - Script
The Jupyter notebook used to upload the brain tumor data to Nexus for this demonstration has been uploaded to Datature's Github repository. You can access the full implementation and detailed comments there. Here's a snippet of the main body of codes to give you a glimpse.
# Install Datature Library
! pip install --upgrade datature

# Import
import os
import time
import datature

# Edit these accordingly
data_path = "/Users/Demo_BrainTumor/data" # PATH_TO_YOUR_DATA_FOLDER
secret_key = "00000000000000000000000000" # YOUR_SECRET_KEY

# Authenticate
datature.secret_key = secret_key

# Create an upload session using the Datature API.
upload_session = dt.Asset.upload_session()

# Initialize number of files uploaded.
files_uploaded = 0
# Now, we'll loop through the assets in the data directory and add them to the upload session.
for file in glob.glob(f'{DATA_PATH}/t1gd/*.nii'):

    # Add the asset to the upload session, specifying the orientation as 'z'.
    upload_session.add(file, orientation='z')
    files_uploaded += 1

# Check to make sure that the path we specified contained files.
assert files_uploaded > 0, 'No files were uploaded. Please check your data path.'

# Now that we've added all of the assets to the upload session, we can start uploading them to Datature.
op_link = upload_session.start(background=True)['op_link']

# We can check the status of the upload session by calling the .retrieve() method.
while dt.Operation.retrieve(op_link)['status']['progress']['with_status']['finished'] != files_uploaded:
    print(f'Uploading files...')
    time.sleep(1)  # We sleep here to keep incrementally checking on our upload status, as well as to prevent spamming the API.

print(f'Finished uploading {files_uploaded} files to Datature Nexus.')

# See asset statistics of a specific asset group after the upload
datature.Asset.group("main")
In addition to the codes used in this demo project, our resources page on Github has a collection of sample codes demonstrating how to use Datature’s Python SDK and work with DICOM files. Be sure to check it out!
4. Inspecting the Uploaded Data and Annotating Scans
Once the dataset is uploaded, the 3D scans can be found under Dataset on Nexus.
The Nexus Platform : Dataset Page (Assets)
Double-click one of the assets to enter the viewing and labeling modes.
The Nexus Platform : Annotator for 3D Image Labeling
5. Upload Annotations (Optional)
If you have pre-existing annotations, you can also upload them onto the platform. We currently support a set of specific annotation formats like COCO. For medical imaging, annotations can often come in the form of bit masks. Below, we show a code snippet for converting your .nii files of bit masks into valid COCO annotations which can subsequently be uploaded onto the platform.
import os from pycocotools import mask import glob import datature as dt import nibabel as nib import matplotlib.pyplot as plt import numpy as np from datetime import datetime, timezone import time import json
NUM_IMAGES = 155 # Number of images per .nii file.
def create_rle_mask(mask_data: np.ndarray[int]) -> dict: """ Given a binary mask, we create the RLE mask.
Input: mask_data (ndarray): binary mask
Output: rle_mask (ndarray): RLE binary mask """
# Since the RLE mask requires a fortran array, we need to encode the mask_data as a fortran array. rle_data = mask.encode(np.asfortranarray(mask_data).astype(np.uint8))
# Now we create the RLE mask using the string encoding of the bytes. rle_mask = {'counts': rle_data['counts'].decode('ascii'), 'size': rle_data['size']}
def create_annotation_entry(curr_image_id: int, curr_annotation_id: int, category_id: int, rle_mask: dict) -> dict: """ Given the current image id, current annotation id, category id, and rle mask, we create the annotation entry.
Input: curr_image_id (int): current image id curr_annotation_id (int): current annotation id category_id (int): category id rle_mask (dict): RLE binary mask where the keys are 'counts' and 'size'.
def create_image_entry(filename: str, img_shape: tuple[int, int], curr_image_id: int) -> dict: """ Given the filename, image shape, and current image id, we create the image entry.
Input: filename (string): filename of the image img_data (tuple): image shape, which is a tuple of the image's width and height curr_image_id (int): current image id
def create_coco_json(nii_labels_path: str, classes: dict[str, int]) -> dict: """ Given the original nii_path, which is a directory to .nii label files, and the output_path, which we stored our updated binary masks, we create a COCO format json file.
Input: nii_labels_path (string): path to directory containing .nii files output_path (string): path to directory where you want to save the numpy arrays classes (list): list of classes in the dataset
Output: None """
# Initialize the items in the COCO json file. info = create_info_entry() images = [] categories = [{'supercategory': key, 'id': val, 'name': key} for key, val in classes.items()] annotations = [] licenses = create_licenses_entry()
# Use to keep track of the image id. curr_image_id = 0 curr_annotation_id = 0
# Now we create annotations from each image's binary mask (located in output directory); simutaneously, we create the RLEs for file in glob.glob(f'*.nii', root_dir=nii_labels_path): # We specify root here since we use the the filename later.
# Load in the .nii file, create ndarray of the data. nii_mask = nib.load(os.path.join(nii_labels_path, f'{file}')) nii_mask_data = nii_mask.get_fdata()
# Go through each frame in the .nii label file and create its RLE binary mask. for i in range(nii_mask_data.shape[2]):
# Add the image entry in the images dictionary (remember to add the frame number to the filename and orientation). images.append(create_image_entry(f'd{file[1:-4]}-z#frame={i}.jpg', nii_mask_data[:, :, i].shape, curr_image_id))
# Now create the rle binary mask for each of the classes (not background) in the current frame. for _, val in classes.items(): rle_mask_data = create_rle_mask(np.where(nii_mask_data[:, :, i] == val, 1, 0)) annotations.append(create_annotation_entry(curr_image_id, curr_annotation_id, val, rle_mask_data)) curr_annotation_id += 1
# Now we begin creating our COCO format json file using the labels and classes for each image. Note that this function is # specific to the dataset we are working with, so it will need to be modified for different datasets. To see this, not that we # explicitly name the image entry by assuming a specific naming convention for our .nii files: # # images.append(create_image_entry(f'd{file[1:-4]}-z#frame={i}.jpg', nii_mask_data[:, :, i], curr_image_id)) # coco_dict = create_coco_json(f'{DATA_PATH}/labels/original', {'edema': 1, 'non-enhancing tumor': 2,'enhancing tumor': 3})
# Save the coco_dict as a json file. with open(os.path.join(f'{OUTPUT_PATH}', 'coco.json'), 'w') as f: json.dump(coco_dict, f)
6. Annotate Scans
Annotation Tools
Nexus provides a wide range of annotation options, including Rectangle, Polygon, Paintbrush, and Freedraw, each with its own unique advantages. When dealing with irregular shapes like brain tumors in this case, it is recommended to utilize the paintbrush or freedraw tools for optimal results. Additionally, Datature provides an AI-assisted annotation tool called IntelliBrush, which can be used to achieve precise mask outlines effortlessly. By simply selecting regions that are in or out of interest with a few clicks, IntelliBrush generates pixel-perfect masks. It also features adaptive learning, meaning IntelliBrush uses real-time feedback to be more precise - the more you use IntelliBrush, the smarter it gets.
Interpolation Mode
When it comes to annotating videos or 3D images, many of us can relate to the frustration of having to annotate each frame or slice individually. Datature addresses this challenge with a feature called Video Interpolation. This functionality utilizes linear interpolation to offer annotation suggestions in other frames based on the user's manual annotations. As a result, the annotation process becomes significantly more efficient and streamlined. If you are interested in knowing the technical aspects of the video interpolation feature, we invite you to explore our previous blog post Accelerating Video Annotation with Video Interpolation/Video Tracking.
Using IntelliBrush and Interpolation to Accelerate Medical Imaging Annotation
We have prepared a tutorial video showing how we used the combination of IntelliBrush and Interpolation Mode to annotate 3D brain tumors for this demo project with just a few simple clicks.
Thanks for reading the first article of this two-part series! We hope you found it informative and insightful. Stay tuned for the upcoming second article, where we will dive into the exciting topics of data augmentation, model training, and deployment!
What’s Next?
If you want to try out any of the features described above, please feel free to sign up for an account and use our Annotator to try out IntelliBrush and Video Interpolation.
Our Developer’s Roadmap
Datature remains committed to further developing the platform to align it with the needs of many users coming from the medical industry. We are cognizant of the multitude of medical data in a range of use cases from other types of medical imaging data to movement tracking. Datature is actively working to support more of these use cases in the near future so stay tuned for these upcoming releases.
Want to Get Started?
If you have questions, feel free to join our Community Slack to post them there. Or speak with our experts to find out how Datature can help your startup, research, or company build and ship computer vision models 10x faster! We look forward to learning more about your vision and how we can best support it.
Highlights
Datature Nexus is an end-to-end MLOps platform that simplifies the computer vision workflow for individuals and businesses looking to incorporate artificial intelligence (AI) into their projects. Users can annotate and augment images, train state-of-the-art computer vision models, and seamlessly deploy them — all without the need for coding expertise.
Nexus now extends its support to medical image formats, including DICOM and NIfTI! Continue reading to discover how you can leverage Nexus to create and deploy your customized deep learning model for medical applications.
This is the first article of a two-part series. In this article, we will dive into why Nexus might be the perfect choice for you, along with a step-by-step guide on how to upload and annotate 3D medical images with Nexus. In the next article, we'll take a closer look at model training and deployment.
What is Non-invasive Medical Imaging?
With the remarkable advancements in medicine over the last century, groundbreaking technologies such as non-invasive medical imaging have emerged as invaluable tools, aiding doctors and medical professionals in making diagnoses and prognoses with enhanced confidence and precision. Imaging techniques like X-rays, computed tomography (CT), magnetic resonance imaging (MRI), and ultrasound offer visual insights into the internal structures of the human body, allowing healthcare professionals to detect anomalies, identify tumor locations, and assess disease progression swiftly and safely. This greatly reduces the necessity for invasive procedures, minimizing the associated risks and improving patient outcomes.
Challenges in Medical Imaging Data Analysis
As the volume and complexity of medical imaging data continue to grow, new challenges arise in effectively analyzing and interpreting these images. Traditionally, the task of examining these images, including the identification and localization of tumors, has relied heavily on the expertise of trained radiologists and doctors. These professionals have shouldered the responsibility of carefully reviewing and assessing each image to detect and diagnose abnormalities. With the escalating volume of imaging data, manually reviewing these images imposes an increasing burden on their already demanding clinical responsibilities, placing additional strain on their time and cognitive resources. This necessitates innovative approaches and solutions for streamlining and automating the image analysis workflow.
Current Solutions for Streamlining Medical Image Analysis
Specialized software tools and platforms have been developed to streamline and expedite various aspects of the image analysis process. For example, ITK-SNAP is a widely used medical image segmentation tool that provides computer-assisted manual segmentation of anatomical structures in 3D and 4D medical images. It leverages active contour methods to facilitate the extraction of object boundaries, enabling semi-automatic segmentation and reducing the time required to trace or segment regions of interest.
Furthermore, recent developments in AI have led to notable improvements in the automation of segmentation and analysis processes. Medical software tools like 3D Slicer have embraced these AI techniques, particularly deep learning, to automate the identification and segmentation of anatomical structures, tumors, and other abnormalities in medical images. These tools deploy “domain-specific models” or “specialized models” that have been specifically trained using large sets of labeled data to identify specific anatomical structures such as the liver, lung, and spleen, or to segment anomalies like brain tumors. Once the model completes the detection or segmentation task, medical experts can review the outcomes and make any necessary refinements.
Limitations of Current Solutions
While these out-of-the-box AI-assisted tools have the potential to significantly reduce the manual effort required from doctors and healthcare professionals, it is important to acknowledge their limitations. These tools rely on pre-existing models that have been trained either by the platforms themselves or through contributions from other users. Since the models are not universally adaptable to all scenarios, doctors and researchers working with unique datasets or tackling rare conditions may find it difficult to take advantage of the automation capabilities provided by these tools. In addition, these tools are typically built as standalone solutions and not meant to be integrated into larger software ecosystems, which can pose integration difficulties for startups and companies seeking to incorporate these solutions into their existing workflows.
Datature’s Solutions and Successful Use Cases
Datature presents an easy solution for such scenarios. The Nexus platform by Datature is an industry-agnostic, all-in-one MLOps platform that supports users at any technical level to effortlessly build, train, and deploy their customized computer vision models. For users who are in the early stages of exploring AI, the platform offers a diverse array of default features to assist them in developing their first model. Meanwhile, users who are more comfortable with deep learning concepts can take advantage of the platform's flexibility to tune various parameters to accelerate production without compromising on model customizability. And most importantly, the platform is designed to support seamless and industry-standard integration, whether it involves deploying the model through Datature’s reliable global cloud infrastructure to scale an application or exporting the model to use it as an inference.
Join the ranks of thousands of teams worldwide who have achieved remarkable success by leveraging Datature's platform to build and launch their products. Read our user spotlights to see how Datature supports HealthTech startups like BrainScanology and MacroInsight in revolutionizing healthcare through AI.
Step-by-Step Guide
In the following sections, we will demonstrate how Datature users can build a customized tumor detection system with Nexus.
1. Preparing the Data
Nexus works well with images from diverse radiology modalities like X-rays, CT scans, and various types of MRI such as T1, T2, and FLAIR. It accommodates a range of image and video file formats, including JPEG, PNG, MP4, as well as specialized medical image formats like DICOM and NIfTI. In this demonstration, we will look at some Gadolinium-enhanced T1-weighted (Gd-T1w) MRI scans in NIfTI format from the Medical Segmentation Decathlon brain tumor dataset.
2. Creating a New Project on Nexus
First, sign up for a free Datature account at http://www.datature.io. Then, log in and follow the prompts to create a new project on Nexus. For more information on how to sign up and create a project, check out our documentation!
The Nexus Platform : Project Home Page
3. Importing Data to Nexus
For common file types such as PNG and JPEG, users can drag and drop the image files into the "Upload Assets" box under Dataset.
The Nexus Platform : Dataset Page (Upload Assets)
For NIfTI files, we can use Datature’s Python SDK either through the Command Line Interface (CLI) or a simple Python script. Both methods will require the system to have Python 3.7 or above installed.
On Nexus, we first need to acquire our project’s secret key. This is only available to project owners to maintain security. As a forewarning, if a project’s secret key is regenerated, the previous secret key becomes invalid and the new key must be used for access.
Go to the project’s Integrations page
Choose "Generate New Secret" to get the project’s secret key
Save the secret key somewhere safe
Method 1 - Command Line Interface
1. Launch a Terminal window
2. Install Datature’s CLI
$ pip install -- upgrade datature
3. Authenticate
Type the following into the terminal then follow the prompts to complete the authentication.
$ datature project auth
4. Upload data
Type the following into the terminal then follow the prompts to enter relevant information about the data.
$ datature asset upload
5. Monitor the progress
Progress bars will be shown in the terminal during the upload process.
Method 2 - Script
The Jupyter notebook used to upload the brain tumor data to Nexus for this demonstration has been uploaded to Datature's Github repository. You can access the full implementation and detailed comments there. Here's a snippet of the main body of codes to give you a glimpse.
# Install Datature Library
! pip install --upgrade datature

# Import
import os
import time
import datature

# Edit these accordingly
data_path = "/Users/Demo_BrainTumor/data" # PATH_TO_YOUR_DATA_FOLDER
secret_key = "00000000000000000000000000" # YOUR_SECRET_KEY

# Authenticate
datature.secret_key = secret_key

# Create an upload session using the Datature API.
upload_session = dt.Asset.upload_session()

# Initialize number of files uploaded.
files_uploaded = 0
# Now, we'll loop through the assets in the data directory and add them to the upload session.
for file in glob.glob(f'{DATA_PATH}/t1gd/*.nii'):

    # Add the asset to the upload session, specifying the orientation as 'z'.
    upload_session.add(file, orientation='z')
    files_uploaded += 1

# Check to make sure that the path we specified contained files.
assert files_uploaded > 0, 'No files were uploaded. Please check your data path.'

# Now that we've added all of the assets to the upload session, we can start uploading them to Datature.
op_link = upload_session.start(background=True)['op_link']

# We can check the status of the upload session by calling the .retrieve() method.
while dt.Operation.retrieve(op_link)['status']['progress']['with_status']['finished'] != files_uploaded:
    print(f'Uploading files...')
    time.sleep(1)  # We sleep here to keep incrementally checking on our upload status, as well as to prevent spamming the API.

print(f'Finished uploading {files_uploaded} files to Datature Nexus.')

# See asset statistics of a specific asset group after the upload
datature.Asset.group("main")
In addition to the codes used in this demo project, our resources page on Github has a collection of sample codes demonstrating how to use Datature’s Python SDK and work with DICOM files. Be sure to check it out!
4. Inspecting the Uploaded Data and Annotating Scans
Once the dataset is uploaded, the 3D scans can be found under Dataset on Nexus.
The Nexus Platform : Dataset Page (Assets)
Double-click one of the assets to enter the viewing and labeling modes.
The Nexus Platform : Annotator for 3D Image Labeling
5. Upload Annotations (Optional)
If you have pre-existing annotations, you can also upload them onto the platform. We currently support a set of specific annotation formats like COCO. For medical imaging, annotations can often come in the form of bit masks. Below, we show a code snippet for converting your .nii files of bit masks into valid COCO annotations which can subsequently be uploaded onto the platform.
import os from pycocotools import mask import glob import datature as dt import nibabel as nib import matplotlib.pyplot as plt import numpy as np from datetime import datetime, timezone import time import json
NUM_IMAGES = 155 # Number of images per .nii file.
def create_rle_mask(mask_data: np.ndarray[int]) -> dict: """ Given a binary mask, we create the RLE mask.
Input: mask_data (ndarray): binary mask
Output: rle_mask (ndarray): RLE binary mask """
# Since the RLE mask requires a fortran array, we need to encode the mask_data as a fortran array. rle_data = mask.encode(np.asfortranarray(mask_data).astype(np.uint8))
# Now we create the RLE mask using the string encoding of the bytes. rle_mask = {'counts': rle_data['counts'].decode('ascii'), 'size': rle_data['size']}
def create_annotation_entry(curr_image_id: int, curr_annotation_id: int, category_id: int, rle_mask: dict) -> dict: """ Given the current image id, current annotation id, category id, and rle mask, we create the annotation entry.
Input: curr_image_id (int): current image id curr_annotation_id (int): current annotation id category_id (int): category id rle_mask (dict): RLE binary mask where the keys are 'counts' and 'size'.
def create_image_entry(filename: str, img_shape: tuple[int, int], curr_image_id: int) -> dict: """ Given the filename, image shape, and current image id, we create the image entry.
Input: filename (string): filename of the image img_data (tuple): image shape, which is a tuple of the image's width and height curr_image_id (int): current image id
def create_coco_json(nii_labels_path: str, classes: dict[str, int]) -> dict: """ Given the original nii_path, which is a directory to .nii label files, and the output_path, which we stored our updated binary masks, we create a COCO format json file.
Input: nii_labels_path (string): path to directory containing .nii files output_path (string): path to directory where you want to save the numpy arrays classes (list): list of classes in the dataset
Output: None """
# Initialize the items in the COCO json file. info = create_info_entry() images = [] categories = [{'supercategory': key, 'id': val, 'name': key} for key, val in classes.items()] annotations = [] licenses = create_licenses_entry()
# Use to keep track of the image id. curr_image_id = 0 curr_annotation_id = 0
# Now we create annotations from each image's binary mask (located in output directory); simutaneously, we create the RLEs for file in glob.glob(f'*.nii', root_dir=nii_labels_path): # We specify root here since we use the the filename later.
# Load in the .nii file, create ndarray of the data. nii_mask = nib.load(os.path.join(nii_labels_path, f'{file}')) nii_mask_data = nii_mask.get_fdata()
# Go through each frame in the .nii label file and create its RLE binary mask. for i in range(nii_mask_data.shape[2]):
# Add the image entry in the images dictionary (remember to add the frame number to the filename and orientation). images.append(create_image_entry(f'd{file[1:-4]}-z#frame={i}.jpg', nii_mask_data[:, :, i].shape, curr_image_id))
# Now create the rle binary mask for each of the classes (not background) in the current frame. for _, val in classes.items(): rle_mask_data = create_rle_mask(np.where(nii_mask_data[:, :, i] == val, 1, 0)) annotations.append(create_annotation_entry(curr_image_id, curr_annotation_id, val, rle_mask_data)) curr_annotation_id += 1
# Now we begin creating our COCO format json file using the labels and classes for each image. Note that this function is # specific to the dataset we are working with, so it will need to be modified for different datasets. To see this, not that we # explicitly name the image entry by assuming a specific naming convention for our .nii files: # # images.append(create_image_entry(f'd{file[1:-4]}-z#frame={i}.jpg', nii_mask_data[:, :, i], curr_image_id)) # coco_dict = create_coco_json(f'{DATA_PATH}/labels/original', {'edema': 1, 'non-enhancing tumor': 2,'enhancing tumor': 3})
# Save the coco_dict as a json file. with open(os.path.join(f'{OUTPUT_PATH}', 'coco.json'), 'w') as f: json.dump(coco_dict, f)
6. Annotate Scans
Annotation Tools
Nexus provides a wide range of annotation options, including Rectangle, Polygon, Paintbrush, and Freedraw, each with its own unique advantages. When dealing with irregular shapes like brain tumors in this case, it is recommended to utilize the paintbrush or freedraw tools for optimal results. Additionally, Datature provides an AI-assisted annotation tool called IntelliBrush, which can be used to achieve precise mask outlines effortlessly. By simply selecting regions that are in or out of interest with a few clicks, IntelliBrush generates pixel-perfect masks. It also features adaptive learning, meaning IntelliBrush uses real-time feedback to be more precise - the more you use IntelliBrush, the smarter it gets.
Interpolation Mode
When it comes to annotating videos or 3D images, many of us can relate to the frustration of having to annotate each frame or slice individually. Datature addresses this challenge with a feature called Video Interpolation. This functionality utilizes linear interpolation to offer annotation suggestions in other frames based on the user's manual annotations. As a result, the annotation process becomes significantly more efficient and streamlined. If you are interested in knowing the technical aspects of the video interpolation feature, we invite you to explore our previous blog post Accelerating Video Annotation with Video Interpolation/Video Tracking.
Using IntelliBrush and Interpolation to Accelerate Medical Imaging Annotation
We have prepared a tutorial video showing how we used the combination of IntelliBrush and Interpolation Mode to annotate 3D brain tumors for this demo project with just a few simple clicks.
Thanks for reading the first article of this two-part series! We hope you found it informative and insightful. Stay tuned for the upcoming second article, where we will dive into the exciting topics of data augmentation, model training, and deployment!
What’s Next?
If you want to try out any of the features described above, please feel free to sign up for an account and use our Annotator to try out IntelliBrush and Video Interpolation.
Our Developer’s Roadmap
Datature remains committed to further developing the platform to align it with the needs of many users coming from the medical industry. We are cognizant of the multitude of medical data in a range of use cases from other types of medical imaging data to movement tracking. Datature is actively working to support more of these use cases in the near future so stay tuned for these upcoming releases.
Want to Get Started?
If you have questions, feel free to join our Community Slack to post them there. Or speak with our experts to find out how Datature can help your startup, research, or company build and ship computer vision models 10x faster! We look forward to learning more about your vision and how we can best support it.
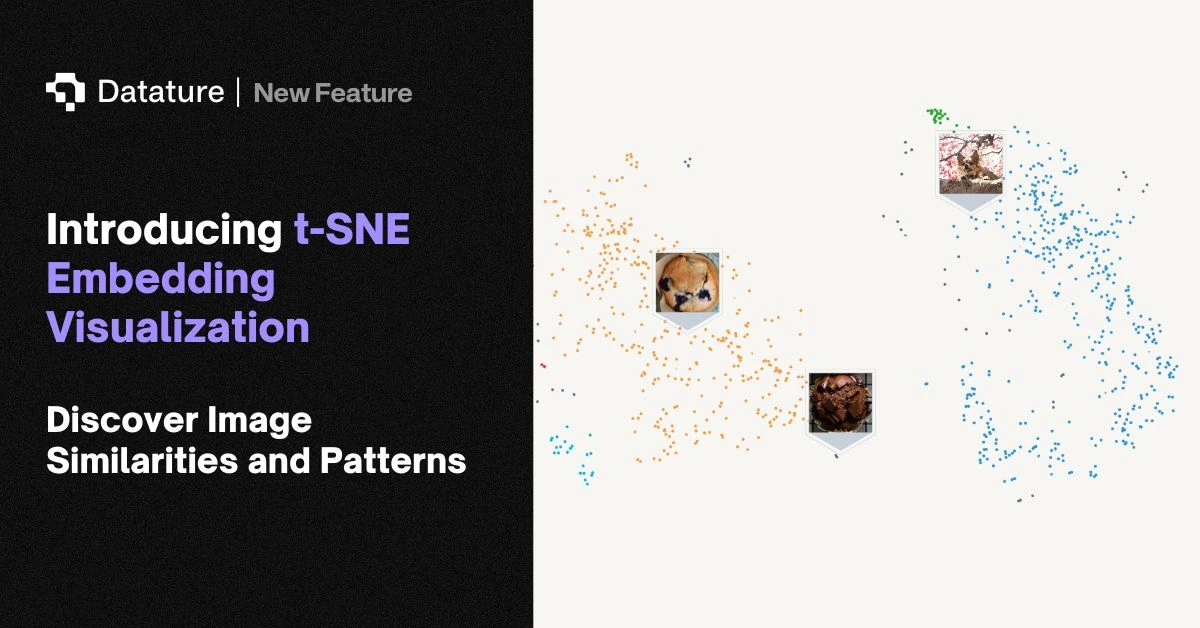
Introducing t-SNE Embedding Visualization on Datature: Discover Image Similarity and Patterns
5
MIN READ
August 25, 2025
This is some text inside of a div block.
Datature is excited to launch t-SNE Embedding Visualization, an intuitive way to explore image embeddings and reveal patterns in your datasets. By projecting high-dimensional vectors into an interactive 2D map, you can quickly spot duplicates, detect anomalies, understand distribution, and speed up labeling. With lasso selection, hover previews, and tunable parameters, the Projector turns raw embeddings into clear, interpretable clusters—helping teams across industries manage large-scale image data with ease.
This article introduces D-FINE, an advanced object detection model addressing the limitations of traditional methods. It uses Fine-grained Distribution Refinement (FDR) for precise bounding box adjustments and Global Optimal Localization Self-Distillation (GO-LSD) for efficient learning. The article also demonstrates fine-tuning D-FINE on custom datasets with Datature Nexus for real-world applications.
How to Use LiteRT for Real-Time Inferencing on Android
8
MIN READ
November 6, 2024
This is some text inside of a div block.
This article introduces LiteRT, Google’s rebranded tool for on-device AI, with a step-by-step guide to deploying models on Android. It covers model export, integration, and optimization, showcasing how developers can leverage LiteRT for efficient real-time performance in mobile applications.


.jpg)